 | Laptop installation hints |
Device
Laptop Gericom 1st Supersonic, Model A440
Bios
Phoenix Bios 4.0 Release 6.0, Version A.0B-5719-6221
Video
Trident Cyberblade i1
Kernel (uname -r)
2.4.18-3 (RedHat Linux 7.3)
Modem (scanPCI)
Lucent Microelectronics LT WinModem, vendor 0x11c1, device 0x0450, Mars 3 Mercury data fax Global board
CD/DVD (cdrecord -scanbus)
TOSHIBA DVD-ROM SD-R2002 (4x4x6x24x)
External devices
Creative Webcam II USB, 10/100 LAN-PCMCIA-card
OS
DR-DOS, Linux RedHat 7.3, Win ME (preinstalled)
Desktop
Gnome/Sawfish
Relevant used applications
Internet dial-in via RedHat Network Monitor
StarOffice 5.2
kwrite, konqueror (w/o kde-desktop)
efax program suite
GnuPG
Printer system
LPRng (system settings)
View
![[image of A440]](other/lpimg.jpg)
One way to setup
In case a contained link has gone outdated it perhaps may still be found in the WAYBACK MACHINE (http://archive.org/web/)
Common To be read first
Windependent DOS partitions Make DOS, ME and Linux live beside each other on the hard disk
Access diskettes
Write CD's
View DVD's
Modem/PPP
Fax Faxing from StarWriter and KWrite, poll faxes from command line
Browser-plugins
Xanim The 'missing' media player
IPv6 The 'new' internet address format
Email-encryption
Webcam
Kernel compilation
German telephone plug
Win-keys How to use the Windows-Start-Menu- and define other keys
Bind Nameserver without your internet provider's restrictions
Firewall A simple IPv4 firewall with 'online-alarm'
Anti-Virus
Java-paths and automatic execution Java runs on Linux, Win32, Macs, Suns and more
Java-plugin
Alsa Sound system
StarOffice hints Setup printer to fax and print into PostScript and PDF-Documents
Bits and pieces Some maybe useful hints
Workarounds Some maybe needed hints
About Cygwin How to run Linux programs and to have a Linux-XServer (desktop) under ME
Homepage
Latest updates: 2003-08-15 [overworked to fit conditions for a fresh installed RH73 _without_ any (RedHat-) updates], 2003-11-24, 2004-03-17, 2004-08-17 [minor page design change], 2007-08-07 [moved page to new server], 2008-03-30 [updated links to IPV6 HowTo], 2011-05-15 [ltmodem, fax and Starwriter infos slightly extended]
Author: Michael Besteck ( ), Germany
Common
Preface
This is how to get it running on the A440. All here are my personal solutions, which work on my system. Please report any bugs, typing errors or improvements.
Whatever You change on Your system, make backups first!
As stated in the Gnu Public License, which applies to all programs and scripts on this website that i have the copyright on, there is _no_ warranty of any kind for correct functioning.
Words and expressions in BIG LETTERS are commonly used as a sort of variables or placeholders, to be replaced with individual content depending on the context they appear in. As established for program parameters, square brackets ('[', ']') mark optionals, the pipe ('|') marks alternatives.
Further information about Linux mobile computing can be found at http://tuxmobil.org.
The actual RedHat version can be downloaded for free from RedHat (which pays only using high-speed internet access).
Some of the scripts provided herein used different newline characters and may appear not linewise when viewed. They are useful objects to try the chgLineBreaks flex application.
%
Documentation and help
Three of the four RedHat documentation documents from the CD-set contain common appliable information and should be a must to install. For RedHat 7.3 they are located on the 6th of the 6 CDs. That download pays even with a V90 modem.
The Howto's, available beyond lots of other useful infos can be found at
http://www.ibiblio.org/pub/Linux/docs/HOWTO/other-formats/html/Linux-html-HOWTOs.tar.gz,
the info program, the man pages and the readme-files within the sources will provide all missing details needed to know. A further source of information are the RFC documents which can be found at several sources, e.g. ftp://FTP.FCCN.PT (username 'anonymous', password 'name@host.domain') in the path '/pub/IETF/RFCs'.
Some helping commands:
help help, info info, man man, whatis whatis, locate -i SEARCHNAME, apropos SEARCHNAME, PROGRAMNAME --help (sometimes -h)
Hint: the 'man' command outputs sometimes different documentation depending on the 'chapter' specified (if any), E.g. 'man passwd' gives instruction how to use the 'passwd' command while 'man 5 passwd' explains the format of the /etc/passwd file.
After the release of a 'man' command just press 'h' to get help howto search and navigate inside the man page, for the info-command it's [Control]-'h'. If a command outputs lot of text, use 'COMMAND | more' or 'COMMAND | less'. To search outputs, the grep command is useful, e.g. 'apropos SEARCHWORD_A | grep -i SEARCHWORD_B'.
If any external link cannot be accessed it may be a help to ask a search engine (google, yahoo, etc.)
%
Important
It is possible that the A440 will change its status from switched off to switched on without any user interaction. As a workaround i would suggest to secure boot with a grub-bootloader password (see below) and/or to remove telephone line connection.
This happened more than once under the following (and other) circumstances:
1. Shutdown with final message 'Power down'.
2. A440 connected to telephone line
3. Incoming call, not answered by any other device
4. Panel display not closed
5. A440 connected to power supply, no battery
6. BIOS-setting 'Silent Boot' was set to 'Enabled' - the BIOS setup program explains this option with 'Logo screen during boot' (versus 'POST screen' and 'Black screen')
Maybe this behaviour is dependent on the charge state of some internal condensators.
%
Hard disk partitions
One way to install on a win-only drive (as delivered) is the RedHat setup program. Another is to use the parted and grub programs (as diskette-versions !) separately. Here is a grub bootloader definition file (/boot/grub/menu.lst) which allows another DOS partition as first primary partition. The trick is to change the partition type of the DOS partition so that ME keeps it untouched. Before setting up grub manually it is recommended to create and test a boot disk.
As reported by Gericom service: The maximum size of a hard disk for replacement supported by the BIOS is 40 GB.
%
In case you choose the ext3 filesystem for the Linux partition (what i would strongly recommend), a 'kjournald'-message should appear during boot. Ext3 should be a must because it will reduce the number of file-system-check runs dramatically (i never had one using kjournald and documentation says there will never be...) and is not installed by default. To enable this super feature use the ext3-filesystem during installation and keep attention to enable 'experimental' drivers when configuring a new kernel - it works fine on my system/kernel with 'CONFIG_EXT3_FS', 'CONFIG_JBD' and 'CONFIG_JBD_DEBUG' all set to 'y' in the usr/src/linux-2.4.18-3/.config file (check it after running menuconfig).
%
BIOS
BIOS setting OS-Type _must_ be set to Other. The originally installed ME still works with this setting.
%
If programs do not run
In case of malfunction as user and correct function as root it might help to chmod the involved files to be executed as root, but this may decrease system safety. Executables as shell-scripts created with an text-editor from scratch usually need to be chmod'd to be executable at all - empty files can also be created using the touch command. (related infos: man bash, then search for 'umask') Change BIOS settings as last try if you cannot find the source of an error. The command 'tail -f /var/log/messages', given from inside a console window, may help to find problems.
%
Webcam
If You want to try the webcam, it is strongly recommended to do that first (including compiling an optimized kernel). Otherwise some software has to be reinstalled when deciding (or needed) later to build a kernel.
%
Kernel
Kernel-sources (from CD) should be installed, some programs cannot be compiled without. After installing new modules issue the commands depmod -a and modprobe MODULENAME load, modprobe -r MODULENAME to unload modules. lsmod shows actually loaded modules. Although not recommendable for daily use these system modifications are much easier to do logged in as root. Setup firewall when testing modem online - not as root.
%
Power managment
APM/ACPI: There is a problem when closing the display panel: it can happen on (re-)opening the display panel that the display gets active for a moment but then stays black. Waiting for Kernel 2.6. Nevertheless, 'apm -S', even 'apm -s' work fine as long as the display panel is not closed.
%
Infrared
IrDA: The A440 versions sold by the 'Lidl' supermarket do _not_ support IrDA, although all IrDA software works fine under RedHat 7.3 as much as under ME. As is it seems only few and cheap modifications may make IrDA possible.
This may also depend on the BIOS version (BIOS-IrDA-status disabled grey vs. active). Please report experiences using other BIOS versions.
By the way, the Gericom company offers two different BIOS-versions to download for the A440 - with and without IrDA-support.
%
System services
Success of most configuration hints depend significantly on the services running or not, which can be setup via System.services. This is a list of some services that "may" run and "may not" run.The file /etc/modules.conf contains information about modules/drivers and is changed during setup of different software. This is how it may look after having installed what is described here. The 'golden' rule: As few as possible, as much as needed to keep safety and performance high.
PPP Modem Dial-In connection
Error: LCP: timeout sending Config-Requests (tail -f /var/log/messages):
The behaviour depends significantly on different BIOS settings, OS-Type _must_ be set to 'Other'.
Modem driver sources ltmodem-8.26a9: http://www.heby.de/ltmodem.
To install extract the archive into any unused directory (this works even with 'mc'). Change in the 'Makefile' the line "MANDIR=..." to "MANDIR=/usr/share/man", issue the commands './build_module', './ltinst2', './autoload'. Then check the entries in /etc/modules.conf - which should have been set automatically during install - to look like these.
PPP parameter (network settings): 'noipx ipcp-accept-local ipcp-accept-remote 0.0.0.0:'
Modem-initialisation in /etc/wvdial.conf:
Init1 = ATZ
Init2 = AT+GCI=42 (or whatever country-code applies)
Init3 = ATS0=0 S10=7 -V90=1 +FCLASS=0 (add 'S38=0' to disable k56Flex)
Init4 = ATQ0B0E1V1L0M0&C1&D2 (quiet)
The remaining entries in wvial.conf should be set by the network-setup program.
Using a regular german telephone plug
In Germany telephone plugs look different, especially there are plugs for telephones only into which the fax/modem plugs do _not_ fit. The problem is caused by the german multi-device telephone plugs which supply hardware-device switching inside the plug. This may be especially problematic using the A440 off-door when only a regular telephone plug is available. To make confusion complete, there are several different type of cables implementing different color-to-signal assignments.
Here is one solution for one individual cable from a regular telephone, it needs fine handwork to change the cables inside the plug without or with soldering. The electrical contact will be as reliable as it is done.
There are also cables available to buy, but unused cables might be recycled this way.
For further informations there is the 'Kabel FAQ' in german language (http://www.kabelmax.de/). Recommended tools are at least a very fine screwdriver and as possible a simple meter.
Before
After
green
4
O
O
3
yellow
yellow
4
O
O
3
white
5
O
O
2
white
5
O
O
2
brown
6
O
O
1
brown
6
O
O
1
green
Never change cable positions in the wall-mounted plug, only at one end of the modem-cable!
(view top-down from 'inside the wall')
Hints to adjust any individual cable:
Contacts 5 and 6 usually stay free.
The modem needs only 2 lines (official names are a and b) to work, which usually must be connected to the both centered contacts in the middle of the RJ-connector; to also support 'plug-device-switching' usually 4 lines are needed.
Between a and b there is a voltage of 60 Volts (i measured 100V) or higher while on-hook. Such can seriously hurt children.
When plugging into multi-device plugs keep attention to the switches 'inside the wall' which are triggered by plugging.
On 3-device plugs left is modem/fax highest priority, middle is telephone, right is modem/fax lowest priority.
If You decided to rather buy a cable, buy only if You are allowed to give back if not working.
Browser plugins
Most modern browser automatically check and overtake plugins installed in Netscape, if any problems occur it may help to check the browser-specific plugin-directory as described for the Java-plugin. For, e.g., Java 1.4 and Mozilla 1.6 it is needed to extend the operating system by ('run-time') libraries for gcc3 compiled software. These are available as rpm's from the RedHat-(Network-)Website as libgcc-3.1-5.i386.rpm and libstdc++3-3.1-5.i386.rpm. The website plugindoc.mozdev.org is a valuable list of links to plugins for Mozilla.
Xanim is a program which can display several media types, expandable by pluggable codecs (xanim-dll's). The xanim homepage is http://xanim.va.pubnix.com/home.html. Another source may be http://www.linuxberg.at/adnload/10185_54158.html. As usual, the readme-files within the xanim2801.tar.gz file contain all needed to know, on RedHat 7.3 the xanim-dlls (.xa-files) work in the version for libc6 (...linuxELFx86c6.xa). They may be copied into their default-directory /usr/local/xanim/mods.
1. extract the 'tarball' with tar -xzf xanim2801.tar.gz
2. copy Makefile.unx to Makefile, uncomment the linux-extra-optimization '-O4 m486'
3. make xanim
4. cp xanim /usr/local/xanim/xanim
5. ln -s /usr/local/xanim/xanim /usr/bin/xanim
6. chown and chmod of the link (5.), the xanim-directory and the embedded files to individual preferences
The plugger-program (man plugger) is preinstalled, but the configuration file '/etc/pluggerrc' may need some adjustment. Due to the many file types handable by xanim (dependig on the installed xanim-dll's) and other programs that come with RedHat 7.3, a fully complete adjustment of the pluggerrc file is a work for it's own and hard to do because samples of all playable data types are needed - samples for some unpopular formats are not easy to find. This is an uncomplete, extendable pluggerrc file, which handles the most popular media types.
Browser plugins sometimes require some particular attention. This is a website handling the popular RealPlayer and Flashplayer plugins in greater detail.
Encrypted Email communication using Mozilla-Mail
Enigmail can be used to encrypt and decrypt Emails comfortable on-the-fly. It works fine with the Linux-Mozilla version 1.31 downloadable from mozilla.org. Not to break the version policy of other installed software of the RedHat 7.3 distribution it may be appropiate to install Mozilla 1.31 additionally without removing the distribution's Mozilla 0.9 version. To do so change /usr/bin/[...xremote...]mozilla to [...xremote...]mozilla09, create links [...xremote...]mozilla131 to the new installed (just extracted) Mozilla 1.31 files, and then create links with the original [...xremote...] names to the 09-versions. This will allow to change the default-mozilla by redifining the 2 non-version-postfixed links.
To use enigmail with Mozilla 1.31 it needs 2 xpi-files, version 0.74, from the enigmail website. If software installation is enabled in the Mozilla preferences, they are easily installed via file->open.
To be able to use encrypted emails, a key, bound to a specific email address, needs to be created: Mozilla-Mail-MenuBar-Enigmail-Generate key. For viewing Enigmail log files a directory, e.g. ~/enigmail-logs, must be created and put in under Mozilla-Mail-MenuBar-Enigmail-Preferences-Log File. Composing emails Enigmail can easily insert the public key part via MenuBar-Enigmail-Insert public key - anybody who wants to communicate via encrypted emails will need the _public_ key of the recipient first in unencrypted format! (The RedHat documentation tells how to use public key servers for that purpose.)
All keys can also be accessed using gpg directly via console. gpg --list-public-keys shows all stored public keys, gpg -a --export user@host > PublicKey.txt saves the public key bound to email address user@host into a text file. The output looks like this:
-----BEGIN PGP PUBLIC KEY BLOCK-----
Version: GnuPG v1.0.6 (GNU/Linux)
Comment: Weitere Infos: siehe http://www.gnupg.org
mQGiBD6HiAoRBACP05M5RhrSUYZtuhOkKYHN2eN+MN/rBEIHlxdcs57gDwCd3AUv
WE+w3k+PsS9oVuMxcCxfZNwBV8SGtlK/g1lVKgt6lF3cFzYGSFmKxaYNBRkLLMMk
wmKlu+C6l1XXRqL6Pr/58kiWQW+RQUm1+IGgZiLhNrvhZejXc4o1Rbtk7wCg+muk
CFSJzDHgOCMvdArKBq3ObxcEAIXoDDKruL814rYa6ZInuzlS6Ie97vavW3/t7F/t
/DRe3F2eZZgI+IhQwx8c5F4ga6mI5ZmVKr5E10NVCxE5MPzXfMdyWvVVYujZUbts
bxlT+ScWpzNXKcaLbsWl1zhRXrSfIDi+attQuqnAStes5RXYuUQmPWQY01TytkqH
1/YSA/wOqDVS6/OU2RFLr8In57ztPGSykrPVJooQdW+gdyv013V7Az3RBhmT5LWM
Gwu19SNKcAtjuR3IWvY+rFgZv9qSPFH1DHbSnLZCR+n8OfTrM7Y+x2iARid3dUlm
a3UdLjClnhNh7cepdYPkYi4IUwvmGY7M8elo6YpGLoggr61nkbRCaW5mb0BjeWRy
by5kZSAoRm9yIHVzZSBvbiBwcml2YXRlIHRydXN0IGJhc2Ugb25seSkgPGluZm9A
Y3lkcm8uZGU+iFcEExECABcFAj6HiAoFCwcKAwQDFQMCAxYCAQIXgAAKCRClUTm8
k1AlVZFgAKD0z1XMQzepHpuLLM52O/kZwAt+/QCgpFf2znnZ+SWqoAMUZ0X9k2qh
TgS5AQ0EPoeIDBAEAIrMEsKP0SberuE5ECaDnWb03QVF4znbn6DhDuZYpwMKwdAB
YymM/BvW/6KExo3OKNIcfUgYh0h+gn2XZCK5NhkAdd52L+90wPJ32qPdESlIApOL
Ifc0+X9eHNPxccRoVc+P2BjwznfYvSm25Hx/VyowdopalLs0l988r9kL8Mo3AAMF
A/9FoneWDL5+++2pRDsseFSHWeh1c38/gQFXr06YhxqiVkoS1M/p97lIqXeEaND8
ckSqqFEcwMo7OHMR4ZbWyquZMk/19i9//Tl51nuE8ImPJ60xg+4jbWZZFC68i/8I
1vybMnqtQuRosn0s4L1uMyU0h0o4X9Y4XNUwmcwkTbOqdohGBBgRAgAGBQI+h4gM
AAoJEKVRObyTUCVV/xUAni/Zqmg8ZOyzLt8ST2lL6knWQ6LUAKDf0S8xUcHzIzA9
0dsAJp+Z3fkVFg==
=xPWg
-----END PGP PUBLIC KEY BLOCK-----
Anyhow, any file can be manually encoded with gpg and be sent as attachment, it's just not as comfortable as using the enigmail functionality. The RedHat documentation explains the manual use of gpg in detail.
To de-, or encrypt files out of Mozilla-Mail, e.g. mail-attachments saved to disk, 'gpg --decrypt Filename > Filename' and 'gpg --encrypt [-a] > Filename' will do. To use a public key found anywhere, e.g. on a website, save it to, e.g.,keyfile.txt and use 'gpg --import keyfile.txt' to make it available to gpg.
IPv6
Ipv6 is the internet address format of the future (and present). Beyond many pro's there is also the fact that it may be used to decrease privacy using a fixed, hardware-based identifier (e.g., network-card-MAC, cellphone-hardware-id, TCPA-stuff-id) as part of the internet address. Details are explained in the Linux-IPv6-HOWTO, available at http://www.bieringer.de/linux/IPv6/IPv6-HOWTO/IPv6-HOWTO.html.
To enable Ipv6, my /etc/sysconfig/network file looks like
HOSTNAME='localhost.localdomain'
NETWORKING='yes'
NETWORKING_IPV6='yes'
IPV6INIT='yes'
#IPV6_AUTOCONF='yes'
IPV6_GATEWAYDEV=tun6to4
The lines
IPV6INIT='yes'
IPV6To4INIT='yes'
may be appended to the network-device files in /etc/sysconfig/networking/profiles/default.
In /etc/modules.conf it will need the line
alias net-pf-10 ipv6
Already present in a SuSE 6.2 distribution, here are some samples for the /etc/sysconfig/networking/profiles/default/hosts (->/etc/hosts) file:
127.0.0.1 LOCALHOSTNAME LOCALHOSTNAME.LOCALNETNAME
:1 localhost.localdomain localhost ipv6-localhost ipv6-loopback
:1 LOCALHOSTNAME LOCALHOSTNAME.LOCALNETNAME
e00::0 ipv6-localnet
f00::0 ipv6-mcastprefix
f02::1 ipv6-allnodes
f02::2 ipv6-allrouters
f02::3 ipv6-allhosts
[here follow Ipv4 entries of localnet-hosts like
12.34.56.78 LOCALNETHOST]
For further details please read the Ipv6-HOWTO and the doumentation of bind9 in the /usr/share/doc/bind-9.2.0/arm directory (and the related RFC-documents mentioned in those, some are present in /usr/share/doc/bind-9.2.0/rfc).
Hint: As reported (in german language) by the heise Verlag on occasion of the Sysadmin day 2007, it may cause problems to proclaim the name "localhost" as hostname in dedicated environments. Please read http://www.heise.de/netze/artikel/92852/2 for further information.
Faxing (send and poll) using the efax-package programs
As of 2003-03-08 efax v 0.9a-001114, _no_other_version_, must be installed.
To install remove package efax (e.g. using gnorpm - remember to check efax version after running the installation CD), 'make clean', 'make all', 'make install'.
There is an authoritative hint to install _not_ as root.
The script /usr/bin/fax needs modifications to avoid modem problems (the workaround is to unload and reload the modem-driver modules) and to enable fax-printing from applications like kWrite or StarOffice. This version of the fax script (rename to 'fax') works on my system and implements an additional command 'poll' (via console) to phone a fax server and retrieve fax documents. Instructions how to use can be found in the man pages and in the source of the fax script. This fax script redefines the directory locations to reside inside the user's home directory.
All fax data (incoming and outgoing fax-files, logs and the telephone-nr. dictionary) are placed under the directory '~/fax'. The first time fax is used the directory 'fax' inclusive subdirectories and the file ~/.efax.rc for changing fax-behaviour are created if not existing. The log file via system log (/var/log/messages) is the only place where all data about faxes of _all_ users are available out of home. This behaviour can be changed from total 'home' privacy to none by adjusting the script /usr/bin/fax and is one way to overview fax-traffic on a per-user base. Unsent fax pages and all fax documents are kept in ~/fax/outgoing, the names of the data and log files contain a postfix describing the result of the fax transfer.
It may be neccessary to chmod at least the usr/bin/efax program to run as root.
A symbolic link /usr/bin/faxlpr -> /usr/bin/fax needs to be present. More details in the efax man page.
Hints how to use fax via console/command line can be viewed with 'fax -help'.
The actual version of fax script is only tested for faxing documents from applications like StarWriter or kwrite and console and for fax polling from console (see below).
'/usr/sbin/usermod -G USERNAME,users,lock,uucp USERNAME',
issued as root, wherein the 'users' group membership is handy for StarOffice installation and access. Log out and in after such that modification.
How to fax from KWrite:
Printer name: 'Send to fax'
Printing system: 'Generic Unix/LPD printing system (default)'
When the kdePrintfax program appears:
configure system -> choose 'efax' and change command to '/usr/bin/faxlpr %number %files'
Instead of a fax telephone number any alias defined in the ~/fax/faxdir file may be used.
'chown -R root.users .' and 'chmod -R 776 .'. Then run the office52/setup program as regular user.
How to fax from Star Office 5.2:
Shut down any running instance of Star Writer, then start /opt/soffice/program/spadmin (or whatever installation dir applies). In spadmin
choose 'Generic printer'
connect->'fax_queue(FAX)'
configure fax output: command '/usr/bin/faxlpr (PHONE) (TMP)', type 'File', settings: greyscale (or black/white)
Print a test page to save settings - it does not matter if the modem is connected to the telephone line when doing so.
Hint: running spadmin _not_ as root offers additionally to apply printer settings per user. It is best to send a personal test fax after spadmin has finished.
Instead of a fax telephone number any alias defined in the ~/fax/faxdir file may be used.
How to print into PDF- and PostScript files from Star Office 5.2 (SO):
0. Close any running instance of SO
1. System.Printer configuration
1.0.0 Name: PDFPrint
1.0.1 New local printer
1.0.2 userdefined device /dev/null
1.0.3 Queue type raw
1.1.0 Name: PSPrint
1.1.1 New local printer
1.1.2 userdefined device /dev/null
1.1.3 Queue type raw
1.2 Save printer configuration
1.3 restart lpd
2. SO printer configuration
2.0.0 for PDF: new printer, driver Acrobat distiller (generic driver should fit too)
2.0.1 Rename to PDFFilePrinter
2.0.2 Connect to queue PDFPRint
2.0.3 Queue command: ps2pdf - /home/USERNAME/PDFPrint.pdf
2.0.4 Print test page
2.1.0 for PostScript: new printer, generic driver
2.1.1 Rename to PSFilePrinter
2.1.2 Connect to queue PSPRint
2.1.3 Queue command: cat > /home/USERNAME/PSPrint.ps
2.1.4 Print test page
This will always print PDF and PostScript into one file (PDFPrint.pdf or PSPrint.ps), overriding the last PDF- or PostScript output.
PostScript files might be viewed with kghostview (but _only_ if they are of type PS level _1_, PDF files using xpdf.
pdf2ps MyFile.pdf MyFile.ps converts PDF to PostScript,
ps2epsi MyFile.ps MyFile.eps converts PostScripts files into bw-image eps files which may be opened with SO.
Two little traps using SO:
If SO does not start it might help to change the start-command from, e.g., '~/soffice52/soffice' to './soffice52/soffice'. If SO starts but does not react on any input, still showing the start-up-window, there might be a dialog hidden behind the start-up-window. In that case it helps to move and resize the main program window so that the dialog becomes visible.
Creative Webcam II USB
Cpia-driver version 1.3.0 and cpia-control version 0.5: webcam.sourceforge.net. As described in the README file therein the cpia*.h and cpia*.c files need to be copied into the kernel source directory.
It might be neccessary to compile a new kernel including modules if not done before.
The cpia-sources do not need to be patched. To install:
1. cd /usr/src/linux
1.1 It is a good idea to compile (a PIII/i686 optimized) Kernel now, including (2.) and (3.)
2. make modules
3. make modules_install
4. reboot
5. cd DIRECTORY_OF_cpia-control-SOURCES
6. make all
7. make install
To experiment with different settings the /usr/local/bin/cpia-control program may be used.
Use GnomeMeeting to set camera parameters too.
Utility gqcam-09 from http://csce.unl.edu/~cluening/gqcam/, to install:
1. cd DIRECTORY_OF_SOURCES
2. make
To run gqcam: 'gqcam -v /dev/video0'
To change the video size in gqcam change it in GnomeMeeting.
To enhance the use of the built-in microphone the alsa sound system might be installed.
Please report configuration details about sucessful H323 video conferences using GnomeMeeting.
There is a GnomeMeeting newsgroup.
![[webcam image showing gqcam]](other/recam.jpg)
running gqcam
Kernel compilation
First some hints:
It may be appropiate to make a link 'linux' to linux-VERSION in /usr/src, some software might expect it.
Always backup the .config file directly after running menuconfig!
Red Hat 7.3 does _not_ contain a separate 'kernel-header' package, it is all in the kernel-sources package.
Especially when testing, it is wise to backup the complete contents of the /boot directory.
To avoid lots of unneeded/unwanted libraries from test-compilations, first correct and check the links in the /boot directory including the grub-definition file in /boot/grub, then remove the /lib/modules/BUILD-NAME directory which is unused.
For an own build the file /usr/src/linux-VERSION/configs/kernel-2.4.18-i686.config file is a good starting point.
This '.config' file is mine, it is based on the i686.config (mainly left off what does not apply to the A440 - kernel will fit on a diskette) and works -as much as experienced-, fine; ACPI and ISDN are disabled. But it shurely has not undergone all the stability-tests RedHat is proud of with their own kernels - anyway, using grub one will have the choice of kernel on any boot.
After a kernel compilation it is neccessary to (re-)install the ltmodem (and maybe some other) software.
One check to see if anything worked fine is to 'depmod -ae' after reboot which shows all unresolved (errorneous) modules if any.
The original installed files '/boot/module-info-2.4.18.3' and '/boot/module-info' (pointing to the latter one) are not rebuild or updated following the RedHat documentation to build a custom kernel. To avoid confusion it seems appropiate to remove them from /boot to a backup directory (or read more Linux documentation like 'Linux system administration guide' et. al. to rebuild).
Using the grub boot-loader and following the RedHat documentation, the new kernel will be automatically included as one more option to the grub boot menu. If anything went wrong, just select the original version (which will not be destroyed) during the next boot (and try again...).
The making of your private Linux-kernel:
Appendix A in the RedHat customization guide explains very well and should be followed exactly, repeated in brief:
1. make a bootdisk
2. cd /usr/src/linux-2.4.18-3
3. make mrproper
4. make menuconfig - and setup the kernel you like to have - more info in the Documentation subdirectory
5. make dep
6. make clean
7. mcedit Makefile and change the (4th) line beginning with 'EXTRAVERSION' to your own favourite version-name
8. make bzImage (may take a while)
9. make modules (may take some while's)
10. make modules_install
11. /sbin/mkinitrd /boot/initrd-YOUR_EXTRAVERSION.img YOUR_EXTRAVERSION
12. make install
Using bind
bind is a program that answers questions like 'which numeric (IP-)address has host X.com' or 'what is the (literal) hostname behind 123.45.67.89'. There can hardly be an easy and detailed description (it is a good idea to check the documentation in /usr/share/doc/bind-9.2.0), this is for the following example-configuration, which even works when never connected different than to a dial-in provider or at all:
A local network consisting of two class A networks:
netA: 10.10.10/24 with host hA1.netA 10.10.10.10 and host hA2.netA 10.10.10.11
netB: 10.20.20/24 with host hB1.netB 10.20.20.10 and host hB2.netB 10.20.20.11
Both nets are connected via hA2, which is physically the same computer as hB2 and has therefor 2 network cards and 2 different IP-addresses - realized as a software router (Linux). hA1 is the A440.
The A440 needs (and bind can do):
1. to provide it's own address and name when not connected nor online
2. to provide it's own address and name when connected (via PCMCIA-card) or online
3. to know about all computers on netA and netB
4. to access a name server (DNS) which resolves the hostnames during internet access
bind shall be used for resolving internet hosts when online - this makes the advantage for stand-alone usage. Usually internet-provider support their customers with comfortable to use own name servers, but very often the provider's DNS are used to censor out unwanted websites. Using bind allows to make a full name request beginning with the predefined root servers in the world. That does _not_ guarantee 'full access' to all websites in the world, but is probably an enhancement. (Some providers censor also websites with perhaps 'virulent' or 'expensive naked dialer' contents, not only politically unwanted sites - be careful yourself then and use the appropiate operating system!)
Security hint: If not blocked by firewall or inside named.conf, it may be possible for anybody on the internet to ask the bind-DNS on the A440 about details of the hosts on netA and netB.
Configuration of bind can be done comfortable using System.bind-config, but should be verified by checking the configuration files manually then. This configuration is also prepared to use IPv6 adresses. They are and might look like these:
/etc/named.conf
/var/named/named.ca
/var/named/localdomain.zone
/var/named/localhost.zone
/var/named/0.0.127.in-addr.arpa.zone
/var/named/netA.zone
/var/named/10.10.10.in-addr.arpa.zone
/var/named/netB.zoneH
/var/named/20.20.10.in-addr.arpa.zone
/var/named/HOSTNAME.zone (optional, see below)
/var/named/localhost-reverse.ip6.arpa.zone
/var/named/localhost-reverse.ip6.int.zone
Other important files:
/etc/resolv.conf contains one line: nameserver 127.0.0.1
/etc/sysconfig/network contains (between other lines): HOSTNAME='localhost.localdomain', even if the locally used hostname is hA1. This might increase privacy on websites asking that information, e.g. via JavaScript. Effectively, the name hA1 is then only valid for the local net, to try out: 'hostname'.
/etc/hosts might look like this:
127.0.0.1 hA1 hA1.netA
::1 localhost.localdomain localhost ipv6-localhost ipv6-loopback
::1 hA1 hA1.netA
fe00::0 ipv6-localnet
ff00::0 ipv6-mcastprefix
ff02::1 ipv6-allnodes
ff02::2 ipv6-allrouters
ff02::3 ipv6-allhosts
10.10.10.10 hA1.netA
10.10.10.11 hA2.netA hA2
10.20.20.10 hB1.netB hB1
10.20.20.11 hB2.netB hB2
/etc nsswitch.conf may contain 2 lines like:
hosts files nisplus dns
networks files dns
/etc/host.conf:
order hosts,bind
reorder on
multi off
To avoid using the provider's DNS the line "PEERDNS='no'" has to be included into each dial-in related file ifcfg-xxx inside /etc/sysconfig/networking/profiles/default/...
If all computers on netA and netB can be trusted, then, and only then (security-risk!), /etc/hosts.equiv may contain all IP-addresses of all machines in netA and netB (hosts.equiv might need to be created newly with appropiate access rights).
Configuring bind is not easy, one _needs_ to read the docs. This configuration avoids forwarders, whose use would result in using the DNS-informations of the forwarders.
The host command should act as follows when not connected to any net:
host hA1 -> timeout (the cost of the universality of this configuration - a solution to this 'problem' is to estalish a master zone '<HOSTNAME>.zone , _but_ this will block access to any hosts wich domain names end with the host name - in result do not name Your computer 'com', 'edu', 'net', 'org', 'info' etc. or accept this timeout. If done, output will be 10.10.10.10.)
host hA1.netA -> 10.10.10.10
host 10.10.10.10 -> hA1.netA
host localhost -> 127.0.0.1
host localhost.localdomain -> 127.0.0.1
host 127.0.0.1 -> localhost
host hA2.netA -> 10.10.10.11
host hB1.netB -> 10.20.20.10
host hB2.netB -> 10.20.20.11
For testing purposes the program iptraf is very useful. Here is a line quoted from the iptraf-logfile (the: XXX-XXX-XXX-XXX was the IP-address of the A440 during that connection)
Sat Apr 5 16:08:59 2003; UDP; ppp0; 475 bytes; from E.ROOT-SERVERS.NET:domain to dialin-XXX-XXX-XXX-XXX.arcor-ip.net:32768
which shows that bind started it search at one of the root servers in the world as defined in named.ca.
The IPv6 part of this configuration is nothing more than a sample starting point, the IPv6-Howto explains more about connecting/tunneling to remote internet hosts, the bind manual in /usr/share/doc/bind-9.2.0 should be consulted too (control-statement, lwres, allow).
To debug the bind configuration as a first step open a terminal, then 'sudo tail -f /var/log/messages', open another terminal and 'sudo /sbin/service named start|stop' to see the bind-messages.
Firewall using iptables
A firewall is a must accessing email or internet, although other operating systems are more attaced, also Linux-viruses had been reported. RedHat 7.3 comes with the really easy to use lockit-program, but extending the system a more detailed configuration might become neccessary. Linux Kernel 2.4 uses iptables as standard-firewall. This script installs a ip4tables firewall, which, as is, allows DNS-loockups, active FTP, regular and secure email transfer (smtp, pop3), regular and save http(s) (internet surfing) and allows several ports for RealPlayer transfers. Please read the RedHat documentation about lockit and iptables and take any further information from the script source. When adjusting to an individual system, most concentration must be taken on the ports served by activated system services.
The command 'sudo cat /var/log/messages | grep "PROTO=" >FirewallLog.txt" writes all iptables-log-lines into a text file.
To see the source-IP-addresses of all dropped packets who did not pass the firewall (run as root) :
cat /var/log/messages | grep "PROTO=" | sed s/^.*SRC=// | sed s/" DST=".*$//
To see the origin in literal notation of those packets (when online):
X=`cat /var/log/messages | grep "PROTO=" | sed s/^.*SRC=// | sed s/" DST=".*$//` ; for h in $X ; do echo -n "dropped packet from ${h} was from " ; host $h ; done
This will output lines like:
dropped packet from 63.240.215.83 was from 83.215.240.63.in-addr.arpa domain name pointer ads.vip.ashb.att.discovery.com.
dropped packet from 216.239.51.99 was from Host 99.51.239.216.in-addr.arpa not found: 3(NXDOMAIN)
There are two scripts, both use the flex-scanner 'fiwali', which output formatted details of all packets dropped by the iptables-firewall inclusive literal description of port-usage and remote hostname. The script 'fiwali-review.sh' shows information about all (past) packets blocked by the firewall, the script 'fiwali.sh' is ment to show firewall blocks as they appear. Both scripts make only sense to use when online since the fiwali-scanner calls the 'host' programm to retrieve the remote hostnames.
Using the following line as command of a menu-entry will comfortably open an editor to make changes in the firewall-configuration, handy for online use: gnome-terminal --use-factory --start-factory-server -e "sudo /bin/bash -c 'sudo mcedit +70 /usr/local/bin/pppFirewall.sh; sudo /usr/local/bin/pppFirewall.sh;sudo sleep 10'"
My experience is that some users not only trust blindly any firewall software, but also get afraid as soon as they see indifferent messages like 'alert, source = 123.45.67.89'. A few facts apply to any firewall:
1. A successful intrusion must pass a firewall and will therefor never cause any alarm - if all activities shall be monitored (which may be a lot in number - too many to decide about manually), then log-commands can easily be included into iptables, the fiwali scanner is open to be extended to do intrusion-detection statistics. But, e.g., if You want to surf or ftp, the ports needed to must be open. Many attacs use such ports and try to do with bugs in the server software or, especially, via email.
2. The packets blocked by firewall causing an 'alarm' need not to be a danger in any case. Those packets often have their origin by so called "script-kiddies" scanning for unprotected systems or advertisers who want Your money, not Your system. Anyway, if there are several firewall-blocks in a short period of time originated from one or a few hosts, to go offline is the safe way.
3. The very best shelter against attacs from internet is not only a firewall, but to run as few servers as necessary! Less is more safety (System.services is where to switch them on and off). To do for example a ftp data transfer, no ftp-server needs to run on the localhost, just a client like gFTP is needed. By the way, the iptables-script can easily be modified and run (RealPlayer-ports on/off, e.g.) while online. To be most safe, just enable those 'extra' ports only when really needed and disable them immediately after use - a console running mc is appropiate to do so.
An IPv6 firewall setup can be found in the Linux-IPv6-HOWTO, available at http://www.bieringer.de/linux/IPv6/IPv6-HOWTO/IPv6-HOWTO.html.
In case the Linux box should be used as router it might be necessary to explicitely call a 'pure' setup-script called from /etc/rc.d/rc.local since otherwise routing may not work.
Derived from the pppFirewall script above this is a ip4tables-firewall script for a Linux software router for a fully trusted local net including direct and squid-proxy-access to internet. It has run more often and is therefor more 'stable' than the script above, but must be called on every boot (e.g. from within /etc/rc.d/rc.local).
One free anti-virus program suite for Linux is called clamav. It is available from the freashmet server, the download-URL (from the belgian mirror) is http://belnet.dl.sourceforge.net/sourceforge/clamav/clamav-0.60.tar.gz. After installation the commands 'man 5 clamav.conf', 'man clamd' and 'man clamdscan' are available. Exectutable files are /usr/local/sbin/clamd, /usr/local/bin/freshclam (updating the virus-database) and in the same directory clamscan, clamdscan and sigtool.
Clam anti-virus is a very universal program that can be applied to many programs like the apache webserver and email-software - the documentation explains details about that. Files can also be scanned directly. But -as much as i understood the documentation- the only action that will take place in a 'minimal installation' (as described below) is to report found viruses, not to delete them. So it may be a good idea to have a terminal showing the output of the clamd-daemon using the command 'tail -f /tmp/clamd.log (depending on the clamav.conf-file).
sudo /usr/bin/tail -f /tmp/clamd.log
1. Download the 'tarball'
2. extract it into TEMPDIR (mc is a comfortable tool to do so)
3. Create a group 'clamav' using System.UserManager
4. useradd -g clamav -d /dev/null clamav
5. passwd -S clamav -> should output something like 'Password locked.'
6. copy the contents of TEMPDIR/clamav-0.60/docs/html into /usr/share/docs/clamav and read it
7. ./configure
8. make
9. make install
10. adjust the contents of /usr/local/etc/clamav.conf to your personal use - My clamav.conf looks like this.
11. as the clamav documentation says, touch /var/log/clam-update.log, chmod 600 /var/log/clam-update.log, chown clamav /var/log/clam-update.log
12. go online, then /usr/local/bin/freshclam and wait until the virus-database is updated
13. copy this script into /etc/rc.d/init.d. There is another, similar script provided in the clamav-source-archive.
14. chkconfig clamav on (further on one may use System.Sercives or serviceconfig' to dis- and enable the virus scanning daemon clamd)
The command clamscan may be used to scan suspicious files or directories.
Depending on personal preferences -as described in the clamav-documentation- freshclam may be started regularly or by menu. For non-flatrate users an entry in the menu-favorites may be defined like gnome-terminal --use-factory --start-factory-server -e "sudo /bin/bash -c 'sudo /usr/local/bin/freshclam;sudo sleep 10'".
There is another installation instruction which is not adjusted to RedHat 7.3 at http://sxs.solo-unix.com.ar/administration/clamav.html.
Java paths and execution
Java should never be installed into a directory whose path contains blanks, under RedHat 7.3 the directory /usr/java is an appropiate home for different Java JRE's and JDK's. Insert before the export statement into /etc/profile:
JDK_HOME='/usr/java/j2sdk1.4.1_01' (installation dir of the JDK)
JRE_HOME=${JDK_HOME}'/jre' (installation dir of the JRE)
JAVA_HOME=${JDK_HOME} (JRE_HOME if just the JRE is installed)
JAVAHOME=${JAVA_HOME} (may be needed for some Solaris-Java programs to work)
PATH=${PATH}':'${JAVA_HOME}'/bin:'${JRE_HOME}'/bin' (may be JDK_HOME if the JDK is installed)
export JDK_HOME JRE_HOME JAVA_HOME JAVAHOME (PATH is exported later on in the scrpt)
Linux supports also to run Java-classes, -applets and executable jar-files from the command line. Details are described in /usr/src/linux-2.4.18-3/Documentation/binfmt_misc.txt and java.txt in the same directory, one will need the files javawrapper, jarwrapper and javaclassname (zipped executable) in /usr/local/bin (which should be part of the PATH-shellvar, see above). Additionally, to use automatic Java execution, this Linux-Kernel feature must be enabled. A good location to do so is inside /etc/rc.d/rc.local. The feature is adjustable, this here is my version (zipped) which does not claim to be the best universal solution at all - it differs from the original sample and disables mc to peek into jar files. If anything went well, after rebooting with enabled Java execution, just type PROGRAM.jar (or select it in, e.g., mc and press Enter) to start the executable in that jar file. If it does not work, first check http://www.tat.physik.uni-tuebingen.de/~rguenth/linux/binfmt_misc.html.
To use the original Java-SDK plugin in Netscape first set the paths, then copy or link, e.g., /usr/java/jsdk1.4.1_01/jre/plugin/i386/ns4|ns600|ns610/[lib]javaplugin[_oji].so into /usr/lib/netscape/plugins. The plugin can be administrated with the program /usr/java/jsdk1.4.1_01/jre/bin/ControlPanel. Somtimes it may help to set (and export)
NPX_PLUGIN_PATH=${JRE_HOME}/plugin/i386/ns4 (with JRE_HOME defined as above)
for Netscape 4. Sun's Java 1.4 documentation explains detailed and should be always downloaded together with the JDK.
All commands are for 3,5 inch, double sided, double density disks (1.4MB DOS-type). Other supported formats are described in the man pages for fstab and mount. In case of problems handling unusual formats/filesystems kernel and/or modules must be compiled for.
This description is ment to be universal and can also be used in emergency cases from console. The RedHat installation probably will have recognized the diskette drive and put a line in /etc/fstab so that mounting and umounting is more comfortable as described in the docs. For easy diskette handling the (last) fstab-line for the diskette drive may look like:
/def/fd0 /mnt/floppy auto noauto,rw,user 0 0
The noauto option might avoid irritations when changing diskettes frequently. The contents of fstab are read during system boot.
info fileutils and man ls are recommended to read, using KdiskFree, e.g. included to Favourites, allows to mount and umount comfortably when automatic mount is not preferred, for example to avoid unwanted changes inside the ME partition.
Attention: specifying a wrong device (/dev/xxx) can destroy _any_ data on the whole hard disk!
To reduce such danger it may be wise to mount specifying the mount-points (directories) instead of the devices or to use 2-line-scripts for mounting and unmounting like
#/bin/sh (this script might be named wount)
mount /mnt/windows
and
#/bin/sh (this script might be named wun)
umount /mnt/windows
To completely erease an unmounted diskette (raw-format without filesystem, usable, e.g., for 'hidden' backups):
fdformat /dev/fd0H1440
Such 'hidden' backups can then be created with 'tar -cjf /dev/fd0 FILENAME(S)' and restored with 'tar -xjf /dev/fd0' (which may result in an ignorable error message because data a read from diskette in fixed sized blocks confusing the bzip2 decrompession with trailing waste data). Advantage of this kind of storage is that less diskette space is used for non-data information and that such diskette is _not_ mountable, neither under Linux nor ME, there is no filesystem.
To completely erease an unmounted diskette and format it with a filesystem of type FST (ext2, msdos, etc.):
fdformat -n /dev/fd0H1440 && /sbin/mkfs -t FST -c -v /dev/fd0
To format an umounted, raw-formatted diskette to use with Linux only (default Linux filesystem extended-2):
/sbin/mkfs -c -v /dev/fd0
To format an umounted, raw-formatted diskette to use with Linux and DOS-based operating systems (FAT-types):
/sbin/mkfs -t msdos -c -v /dev/fd0
Read and write access to a diskette requieres that the diskette will be mounted to the filesystem. Therefor a mount-point (an usually empty directory) is needed, typically inside /mnt, e.g. /mnt/fd (RedHat predefines /mnt/floppy). After mounting the diskette-filesystem, reading from and writing into /mnt/fd accesses the diskette.
Before removing a mounted diskette it is needed to unmount it, otherwise data may be lost!
The man pages for fstab and mount show how to simplify and complicate commands, this shall work without previous system modifications. 'info fileutils' and 'man ls' provide further details.
To read and write a diskette:
mkdir /mnt/fd (if not existing)
[insert diskette]
su -c "mount -t auto /dev/fd0 /mnt/fd"
[access the diskette]
su -c "umount /mnt/fd"
[remove the diskette]
To avoid to input the root password for the su-command, 'su -c "..."' may be replaced by 'sudo ...'. The sudo man page shows details. If /dev/fd0 is present in /etc/fstab, the 'user' option will allow the user to mount and umount, making it 'users' will allow any user.
'df /mnt/fd0' shows a summary of the diskette usage, i.e. free and used space. 'df -T DIRECTORY' shows also the filesystem type.
'du /mnt/fd0' shows the detailed diskette usage, i.e. size, of all files and directories.
To check if the diskette is mounted or not 'mount' without parameter shows a summary of all mounted filesystems.
To exchange data only between Linux and ME via diskette, the 'vfat' filesystem type is a better choice than 'msdos' (long file names).
Ereased diskette files can sometimes easily be reviewed. The 'shred' command may be used for sensitive unwanted data.
Writing CD's
The 'CD-Writing-HOWTO' explains detailed.
CD-writing needs to emulate a SCSI-drive, therefor the installed IDE-driver has to be disabled, replaced by an SCSI-driver. A very short way to get Gnome Toaster and X-CD-Roast running, device names should be checked with 'sudo /sbin/fdisk /dev/hda', 'p', 'q' first:
1. log off and log in again as root
2. change /etc/auto.misc to look like this
3. change /etc/fstab to look like this
4. change /etc/fstab.ALLDEV to look like this
5. change /etc/modules.conf to look like this
6. run this script once - see the README file mentioned in there (which will create a "cdwrite"-group to allow non-root users to write CDs). If updating to the actual version of the X-CD-Roast program, then modify that script to skip the second part.
7. System.UserManager: include root into group "cdwrite" (optional, not for actual X-CD-Roast version, see below)
8. reboot
As of 2003-05-07 version 0.98alpha13 of X-CD-Roast is the actual one, remarkable because it is now able to handle multisession CDs and because of the prepared rpm-packages including updated cdrtools for RedHat 7.3. Details are explained on the X-CD-Roast homepage at http://www.xcdroast.org/. After updating the Gnome Toaster program seems to have problems auto scanning for CD drives. It is anyhow the best solution not use Toaster (with the distro's cdutils) and Roast (with the new cdutils) mixed. The fasted way to upgrade is:
1. rename the "cdwrite"-group to "xcdwrite" using the RedHat user manager (optional, only if the script above [6.] was run)
2. download all rpm-files from http://xcdroast.sourceforge.net/RPMS/a13/redhat-7.3/ (about 2.5 MB) into an empty directory (doing so will prevent gnome toaster to recognize the CDRW-drive as writeable device -can be set manually- due to a version conflict). It is no good choice to write CDs with xcdroast and toaster alternatingly - best to stay with one of both.
3. change to that directory and, as explained on the X-CD-Roast homepage, first "rpm -Uvh cdrtools*.rpm", then "rpm -Uvh xcdroast*.rpm".
The location of the new xcdroast executable is /usr/bin. When extending multisession data CDs using the default settings there will appear a little confusing message about possible problems, so it may be a good idea for the first experiences writing CDs to keep another copy for safe. On my A440 anything worked fine - but i have not tried out anything.
Viewing DVD's
To play DVD videos the program xine is useful, it is also predefined as plugin in /etc/pluggerrc. RedHat 7.3 comes with xine 0.9x. It might be a good idea to upgrade to a version >= 1. The following is a super-fast instruction that should run without errors, if such occur stop, read the README and INSTALL files to find the reason. Manual xine build (there are also rpm-files):
0. remove present xine (-libs) with gnorpm
1. The sources of xine-lib1-beta10.tar.gz, xine-ui-0.9.20.tar.gz and xine-howto-html.tar.gz are available at http://xine.sourceforge.net/.
2. The source-archives might be put in any directory; tar -xzf ARCHIVNAME.tar.gz will create a subdir ARCHIVENAME into which the source and README files are extracted.
3. cd xine-lib1-beta10
4. ./configure
5. make
6. make check
7. make install
9. append the line '/usr/local/lib' to /etc/ld.so.conf
10. /sbin/ldconfig -v
8. repeat steps 3, 4, 5, and 7 for xine-ui-0.9.20
9. cd /dev, then ln -s cdrom dvd
11. mkdir /usr/lib/win32
12. read the xine docs about codecs, which may be downlodaded from http://www1.mplayerhq.hu/MPlayer/releases/codecs/, extract and copy them into /usr/lib/win32
15. in xine-preferences select 'esd' as audio system, /mnt/cdrom as root of search path and under input '/dev/dvd' where a device must be given. In Germany region code 2 applies.
16. reboot
17. insert DVD, start xine and click the 'DVD' button
This way not protected DVD's should play. The DVD 'American Beauty' that was bundled with the A440 will not play so far, but it is possible where it is allowed.
Sad to say, but (to my knowledge) ME ist the better performing os to view movie-DVD's on the A440. Maybe the reason is that the DVD consortium has only allowed strongly commercial operating systems. Without any hardware DVD-accelarator it makes no sense to try to view full-screen DVD-Videos under Linux on the A440.
Use of the start-menu and context-menu keys
During installation or update via CD-boot or using the X-utilities choose the '105 (intl)' keyboard type, german keyboard layout and activate dead keys. This solution is just a workaround and could probably be solved more elegantly like, e.g., explained in the Thai-HOWTO.
For Terminal (not under X):
cd /lib/kbd/keymaps/i386/qwertz
cp de-latin1-nodeadkeys.kmap.gz de-latin1-nodeadkeys.kmap.gz.BACKUP
start mc and edit (F4) de-latin1-nodeadkeys.kmap.gz, append the lines:
# start menu key
keycode 125 = at braceleft braceright
# context menu key
keycode 127 = slash backslash ampersand
For use with X and Gnome/Sawfish:
/etc/X11/XF86Config-4 (and /etc/X11/XF86Config) may contain an uncommented Xkbmodel-definition line. The value must be set to 'pc104'.
In /etc/X11/xkb/keymap/xfree86: Therein the entry: xkb_keymap 'de': one line has to be replaced:
xkb_geometry { include 'pc(pc102)' }; by xkb_geometry { include 'pc(pc104)' };
and there must be a line
xkb_symbols { include 'en_US(pc105)+de' };
My 'Device' therein looks like:
Section "Device"
Identifier "Trident CyberBlade (generic)"
Driver "trident"
BoardName "Unknown"
Option "swcursor"
EndSection
Without the 'swcursor' option the mouse pointer may be displayed dragged to the right - the mouseconfig utility might remove that option silently.
Gnome control center (usr/bin/gnomecc) -> keyboard shortcuts -> add -> scan -> press start menu or context menu key and assign command.
Alsa sound system and utilities
The alsa sound system performs well and comes with a set of useful utilities. Running the distribution's sndconfig program once destroys the original, fine, sound settings. On my system then i could not record via the built-in microphone and playback in acceptable quality. Alsa enables to do so and avoids destroyed sound settings by sndconfig.
The alsa homepage is http://www.alsa-project.org. For the A440 appropiate files to get are alsa-driver-0.9.4.tar.bz2, alsa-lib-0.9.4.tar.bz2, alsa-oss-0.9.4.tar.bz2, alsa-tools-0.9.4.tar.bz2, alsa-utils-0.9.4.tar.bz2; the well explained installation instructions for the soundchip of type via82xx do not recommend to run the incuded sndinit-script, but it seems to be a good idea to do so on the A440. The .sound configuration file in the home directory, '.asoundrc',may look like this, and this is a sample configuration of /etc/.aumixrc. In the ControlCenter (/usr/bin/gnomecc), section Multimedia/Audio, the 'start soundserver' box may be checked.
For alsa to work _all_ sound related kernel parts _must_ be build as modules.
Bits and pieces
Once a window frame is set unvisible through the window menu (useful, e.g., for running xeyes), which then cannot be shown by a simple mouseclick, [ALt]-[Left keypad button]-[Right keypad button] redisplays.
%
Using Konqueror under Gnome/Sawfish to send mail via Mozilla Mail by clicking on mailto:' links without calling kmail:
Startmenu->KDE-menus->settings->network-Email starts the Email-KDE control module. Therein uncheck 'Run in terminal' and input '/usr/local/bin/kmozma.sh %t' with the 'kmozma.sh' script as follows:
#!/bin/bash
/usr/bin/mozilla[131] -edit `echo $1 | sed s/^mailto:// | sed s/^/mailto:/`
%
To start mozilla, -mail, -composer in offline mode is possible using the profile manager, which does not show up when just one profile exists. The link starting the mozilla program, e.g. in the properties of a gnome panel-starter, must be changed to contain the parameter ' -profilemanager'.
The font size in the composer[09] source-window is preset to an uncomfortable small value. To adjust Edit.Preferences.Appearance.Fonts, check the allow other fonts box and set display resolution to other, which may result in about 92 dpi.
The Mozilla On-/Offline switch is located on the right bottom side of the program window.
%
After running Mozilla for some time, probably a 'timebomb'-message will appear. This behaviour is controlled by a preference named 'timebomb_first_launch_time' which can be found (and modified) in ~/.mozilla/default/[...].slt/prefs.js.
%
When using a LAN-card it is sometimes appropiate to switch temporarily off and on the network, e.g. on LAN-parties. To switch the card off '/usr/bin/sudo /sbin/cardctl eject', to switch it on again 'sudo cardctl insert', most comfortable when put in little shell-scripts called via menu ('sudo gmenu').
Not found on my system, i have installed this /etc/rc.d/init.d/hotplug script with the command 'chkconf --add hotplug'. This is surely redundant for the virgin system (since it was not present), but it is a 'standard' script mentioned in some documentation and some software may depend on it. See the script-source, 'man chkconfig', 'man serviceconf' and /usr/src/linux-2.4.18-3/Documentation/usb/hotplug.txt for details.
%
It might be comfortable to have a directory for testing purposes which is automatically cleared on logon. Root will be able to access those contents if logged on as next user. The following script creates and clears a directory named 'autokill' in each users home:
#!/bin/bash
# script autokill.sh
pushd &>/dev/null
cd ~
killdir="`pwd`""/autokill"
filefind=${killdir}"/*"
if [ -d ${killdir} ] ; then
for f in ${filefind} ; do
if [ "${f}" != "${filefind}" ] ; then
### logger "autokill:removing ${f}"
chmod -R -f 777 ${f} &>/dev/null
rm -R -f ${f} &>/dev/null ;
fi ;
done ;
else mkdir ${killdir} ;
fi
popd &>/dev/null
To enable the line '/usr/local/bin/autokill.sh' (or whatever common accessible installation dir applies) has to be appended at the end of /etc/profile. Depending on the owner of the files in ~/autokill it might be that this script does not erease all files, try to append the prefix 'sudo ' to the chmod command (or chmod the script to be run as root) to change that behaviour.
%
The command 'echo $PATH' shows the path. As regular user it may be comfortable to have '.' (the actual directory) inside the path when using console frequently, but since this could be a security risk RedHat did not include. The shorter the path, the less the redundancy, on my system there were double entries. The following lines, included at the end of ~/.bashrc add the dot to the path (just the first line) and remove all double entries from it. It might be a good idea to include the clean path part int /etc/bashrc, but testing out changes with the PATH could make any login impossible then.
PATH=".":${PATH}
##### clean path #####
declare -i N=0
declare -i I
declare -i J
declare -i double
declare -a PA=""
P=$(echo ${PATH} | tr ':' '\n')
for x in ${P} ; do PA[${N}]=${x} ; N=${N}+1 ; done
Pnew=${PA[0]}
for (( I=1 ; I<N ; I++ )) ; do
double=0
for (( J=0 ; J<I ; J++ )) ; do
if [ ${PA[${I}]} = ${PA[${J}]} ] ; then double=1 ; break ; fi ;
done
if [ ${double} -eq 0 ] ; then Pnew=${Pnew}":"${PA[${I}]} ; fi ;
done
PATH=${Pnew}
export PATH
#####
%
RPM is a comfortable program that does not seem to need any further functionality. But in very special cases it may be helpful to extract files from a rpm-package without changing the system and without executing any pre- and post-install scripts. TEMPDIR should be located inside ~, e.g. ~/autokill.
1. all contents of the /var/lib/rpm directory must be copied into TEMPDIR/var/lib/rpm
2. mkdir TEMPDIR/var/tmp
3. rpm --root TEMPDIR -i --allfiles --force -v --nodeps --noscripts *.rpm
(for all .rpm files in current dir, which should be out of the TEMPDIR-tree)
This might not work in any case, but in most.
%
One way to use an external (USB-) mouse instead of the build-in touchpad is to connect it before boot, then select the mouse model when the kudzu programs detects it during boot. During the next boot without external mouse select ignore' when kudzu is missing the USB-mouse. After log-in /etc/sysconfig/hwconf should contain two entries for mice. To switch between the mice run /usr/sbin/mouseconfig, log-out and -in and keep attention to the 'swcursor' option as described above.
%
To make a bootdisk for the actual running kernel as non-root-user: sudo /sbin/mkbootdisk `uname -r`
%
The 'eject' command umounts and ejects a CD in one step, 'eject -t' closes the CD-tray ('insert'). Unfortunally, the '-t' option is not working with the SD-R2002 drive.
%
Fortune is a program that outputs texts and quotes like 'Military intelligence is a contradiction in terms.', it's intention is to give the user thoughts and smiles on login. Enabling fortune messages for the welcome screen via system settings seems to be broken. To at least have a fortune when opening a console window, link /usr/bin/fortune to /usr/games/fortune and include '/usr/bin/fortune' as last line into ~/.bashrc.
Quiz: In which Jackie Chan movie was the Linux-command 'whoami' mentioned?
%
It may be a good idea to include the line 'Defaults always_set_home, requiretty' into the sudoers configuration file (use visudo to do so). To allow all members of group GROUP (the predefined group named 'users' could be a good choice to include all users) to run commands as root via sudo without password (possible security risc!), the line '%GROUP ALL=(ALL) NOPASSWD:ALL' must be present in sudoers.
Depending on the use and the users of the system (for a Laptop usually only one) it may make sense (or not) to put root and the regular LOGINNAME into one common group and set the group of files appropiate so that one may access (and execute) 'common' files independent of doing system work as root or as LOGINNAME. The program to do so is SystemManager and the predefined appropiate group to join as root and user could be 'users'. The wrong use of the SystemManager- and the chmod- and chown-programs may result in severe safety problems when connecting to LAN or internet.
%
To copy a long command input at the console that has already scrolled off the screen the ~/.bash_history file may be checked.
A 'coloured console' is explained in the mini-HOWTO named Colour-ls, about colouring the outputs of the 'ls' (and 'dir') command check /etc/DIR_COLORS.
%
Some network basics can be found in the rfc1739 document.
Workarounds
For users of the up2date program using a password consisting only of digits (0..9):
To make the up2date-configuration work it needs to quote the password in /etc/sysconfig/rhn/up2date.
%
Using Konqueror under Gnome/Sawfish without kde may bring up error messages on start-up or even let Konqueror crash if unappropiate parameters are used. In case such problems occur it can help to redefine the konquerors start command using the menu editor to specify existing directories or files.
%
Using Konqueror as file manager may cause error messages when trying to move files or directories to the kde-Trash. On my system it worked after manually creating a '~/Desktop' directory and then moving a directory as first item into trash. After that procedure trashing with Konqueror worked also on files.
%
After a fresh install the sound performs fine. Running the 'sndconfig' program once, e.g. via the 'setup' program, destroys the original setup sound entries in /etc/modules.conf and even in similar named backups of the modules.conf file. A solution is either to backup modules.conf to a file which name is beginning and ending different, or -increasing sound performance and usability- to install the alsa sound system.
%
Starting kde-applications using the sudo command might cause Gnome to reject any further login as that user. The reason is that kde programs make use of the ~/.ICEauthority file and change its owner. To avoid this behaviour the line 'Defaults always_set_home' must be included in /etc/sudoers, which should be edited with the 'visudo' command - 'man vi' explains the editor - and cause the kde-apps to use the .ICEauthority file inside the home of the "sudo pseudo-user". Disadvantage of this workaround are authentication error messages, but the kde applications will at least run.
In connection with the .ICEauthority file error messages appearing on start and shutdown of kde applications like, e.g. kwrite, can be mentioned; these messages become visible when starting a kde application via console. A brief search at the kde website gives hints to try the programs 'lnusertemp' -which needs either 'tmp' or 'socket' as parameter and 'kbuildsycoca'. Running that programs made the error messages disappear, but one starting with 'Mutex destroy failure', appearing some seconds after the kde application has finished, seems to be hard to avoid - a workaround is to let the 'dcopserver' run in background, for example via console with 'dcopserver &', then, e.g., run 'kwrite'. This way no more error message appears. Maybe a missing socket inside /tmp/ksocket-USERNAME is the reason for that behaviour because root has that socket and no error messages while users have no socket, but error messages - but that might be system-specific.
Some details about the .ICEauthority file: ICE is the abbreviation for Inter-Client Exchange, released by the X Consortium, which is the source of the X-Server. ICE is, for example, used by the DCOPserver which itself is run by kde-applications. The entries within correspond to the zero-sized entries in /tmp/.ICE-unix. The utility iceauth can be used to handle the .ICEauthority file. The iceauth man page does not name the commands, even searching the net does not bring up the available commands easily, they show up only once iceauth is started and 'help' is input at the iceauth-prompt or with 'iceauth help'. To write the contents of the .ICEauthority file into a readable text-file: iceauth -f /home/USERNAME/.ICEauthority list > ICEauthList.txt. This file can then be modified, which _may_ be useful if the local hostname was changed. For details one have to read the file ICElib.pdf, which can be found on the websites of the X Consortium. To create a new .ICEauthority file from a text file as created with the iceauth list command each line of the ICEauthList.txt file has to be prefixed with "add ", then the .ICEauthority file has to be deleted -better renamed-, then iceauth -f /home/USERNAME/.ICEauthority source ICEauthList.txt creates a new .ICEauthority file.
%
Remote login as root is first-class-dangerous and should only be used inside _fully_ trusted local networks. The pam-authentication (used, e.g., for the 'regular' telnetd) requieres the tty ('terminal-id') one wants to log-in on listed in /etc/securetty (e.g. 'pts/5'). To find out which tty-id to use open a console, then 'sudo tail -f /var/log/messages', try to log-in remotely and read the log - or include, e.g., all pts/1..pts/11. The 'regular' (i.e. wu-)ftp-logins can be administered with /usr/bin/kwuftpd but the entry 'root' has to be removed or commented out from /etc/ftpusers.
Cygwin: Linux on top of ME
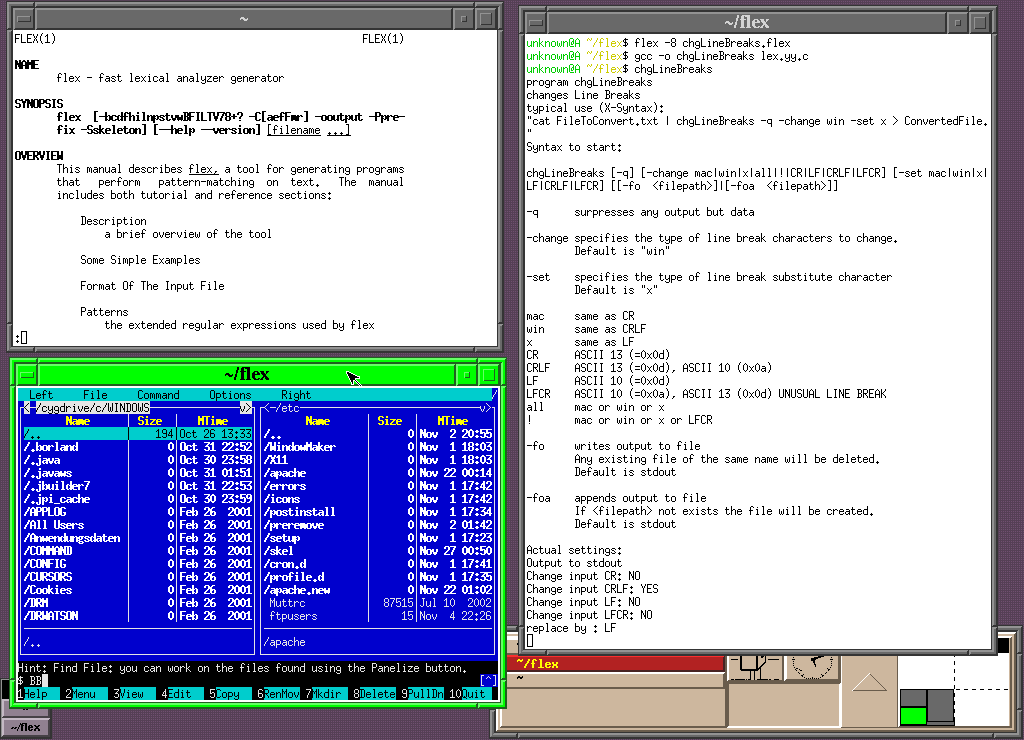
Cygwin is a complete Linux system running (not just) on ME. It allows to try out how Linux feels without system changes. Disadvantage is a slow console - the Cygwin X-console performs better. To install and update there is an easy to use install-program. Cygwin is well documented. Best of all: most Linux utilities and programs can run under Linux and Cygwin and ME using the cygwin-dll. Cygwin is also the only way to run the popular Postgres-database under ME. Here is, e.g., the source of a little flex-scanner, which converts all kinds of linebreaks. It can be compiled without changes under Linux as much as under Cygwin and is also usable as a pure ME program without starting Cygwin. To build flex -8 chgLineBreaks.flex, gcc -o chgLineBreaks lex.yy.c, chgLineBreaks displays explanations how to use. The free (HTML-) editor Phase 52 for win is capable to read and write files in X and win format, a useful Utility when running Cygwin. Here is a screen shot (1024x740, 40kB, png-format - some older browsers like Netscape 4.x cannot display correctly) which shows a Cygwin desktop and the build of chgLineBreaks.
When using (the old) gcc version 2.95 under Cygwin some sources do not compile. The compiler specs file has to be adjusted - this is not needed for actual gcc-versions 3.x. This modified /lib/gcc-lib/i686-pc-cygwin/2.95.3-5/specs file works with gcc 2.95 when Cygwin is installed in C:\cygwin.
%